1.2 UV environments
Story problem
You’ve built a Python script that analyses bus routes in Auckland. Your supervisor wants to run it, but:
- They use Windows, you use macOS
- They have different versions of packages installed globally
- When they run your code, it crashes with import errors
Solution: Virtual environments ensure your project works anywhere, anytime.
What you will learn
- Understand why virtual environments matter
- Create and manage environments with
uv - Add packages and lock versions for reproducibility
- Run scripts consistently with
uv run - Share projects that “just work”
Understanding virtual environments
The problem: Global installations
Before we jump into commands, let’s understand why virtual environments exist—because once this clicks, everything else in this section will make sense.
When you install Python packages globally (i.e., just running pip install pandas without any project setup), those packages go into a single shared location on your computer. That works fine when you only have one project. But the moment you start a second project, you can run into trouble.
Imagine this scenario:
Your computer (global Python):
├── pandas 2.0.0
├── geopandas 0.14.0
└── numpy 1.24.0

Project A needs:        Project B needs:
├── pandas 2.0.0       ├── pandas 1.5.0  ❌ Conflict!
├── geopandas 0.14.0   ├── geopandas 0.12.0
└── numpy 1.24.0       └── numpy 1.23.0
You can’t have two versions of pandas installed at the same time in the same place. So Project A would work, but Project B would break—or vice versa. And this isn’t a hypothetical; it’s one of the most common frustrations in Python development.
The solution: Virtual environments
The fix is surprisingly simple: give each project its own private copy of Python and its packages. That’s what a virtual environment is—a self-contained folder inside your project that holds everything that project needs, completely separate from everything else.
Your computer:
├── Project A/
│   └── .venv/           ← Project A's private packages
│       ├── pandas 2.0.0
│       ├── geopandas 0.14.0
│       └── numpy 1.24.0
└── Project B/
    └── .venv/           ← Project B's private packages
        ├── pandas 1.5.0
        ├── geopandas 0.12.0
        └── numpy 1.23.0
Now both projects work perfectly, because they each have their own copy of everything. No conflicts, no surprises. And when you share your project with a classmate, they can recreate your exact environment on their machine with a single command.
Key uv commands at a glance
Don’t worry about memorising these right now—we’ll walk through each one step by step below. This table is just here for you to come back to later as a quick reference.
| Command | What it does |
|---|---|
uv init |
Sets up a brand-new project |
uv venv |
Creates the virtual environment folder |
uv add <package> |
Installs a package into your project |
uv remove <package> |
Uninstalls a package |
uv sync |
Installs everything listed in the lock file |
uv run <command> |
Runs a command using your project’s environment |
uv pip list |
Shows what’s currently installed |
uv lock |
Updates the lock file |
Creating your first project
Alright, let’s actually build something! We’re going to create a project folder for this course and set it up with uv. By the end of this section, you’ll have a working GIS environment that you’ll use for the rest of the semester.
Step 1: Create a project folder
First, we need a folder to hold your coursework. Open your terminal and run the following commands to create a folder called class343 inside your Documents directory.
cd ~/Documents
mkdir class343
cd class343
cd ~\Documents
mkdir class343
cd class343You’re now inside your empty project folder. Let’s turn it into a proper Python project.
Step 2: Initialise with uv
This is where the magic starts. Run:
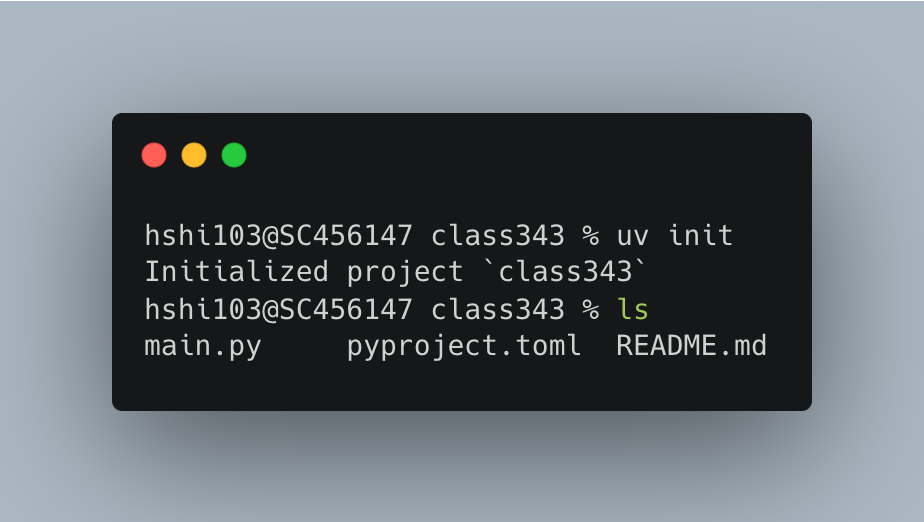
uv initThis single command sets up your project structure. When it finishes, you’ll see that uv has created a few files for you:
pyproject.toml— This is the most important one. It’s your project’s “recipe card” that lists what Python version you need and what packages your project depends on.main.py— A sample Python script to get you started.README.md— A documentation file where you can describe what your project does..python-version— A tiny file that records which Python version this project uses.
Step 3: Take a peek at pyproject.toml
Open pyproject.toml in your code editor. You’ll see something like this:
[project]
name = "class343"
version = "0.1.0"
description = "Add your description here"
readme = "README.md"
requires-python = ">=3.12"
dependencies = []
Notice that dependencies is an empty list right now. That makes sense—we haven’t installed any packages yet. As we add packages in the next steps, you’ll see this list grow automatically. You’ll never have to edit this file by hand.
Step 4: Create the virtual environment
Now let’s create the actual virtual environment—the private folder where all your packages will live:
uv venvYou should see output like this:
Using Python 3.12.x
Creating virtual environment at: .venv
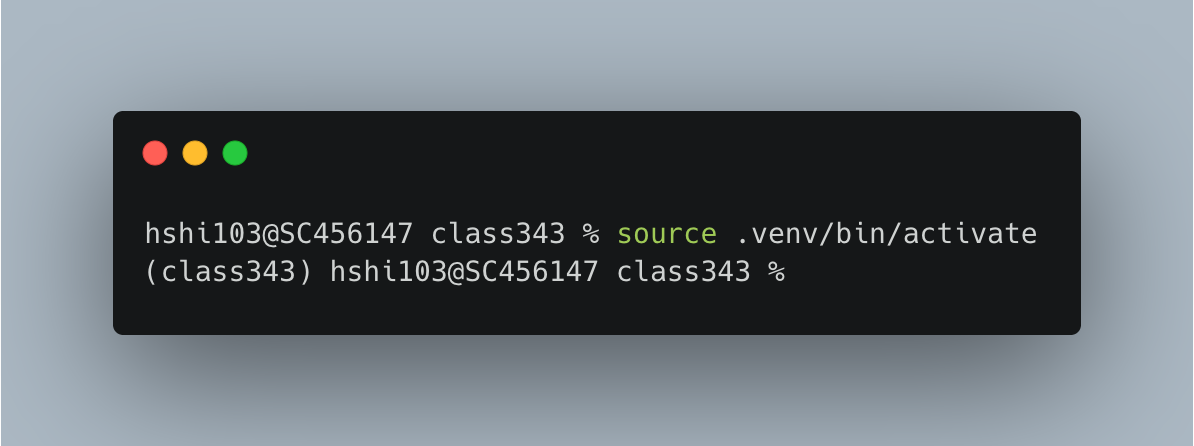
Activate with: source .venv/bin/activate (Linux/macOS) or .venv\Scripts\activate (Windows)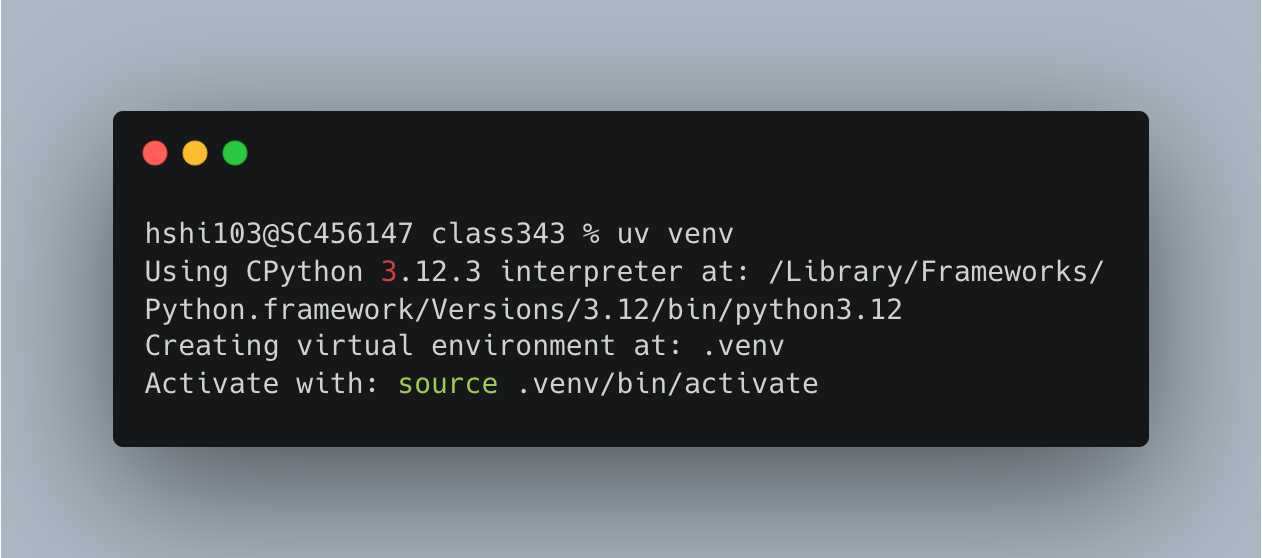
What just happened? uv created a hidden folder called .venv inside your project. This folder is your virtual environment. It contains:
.venv/
├── bin/ (macOS) or Scripts/ (Windows)  ← Python executables
├── lib/                                 ← Where packages will be installed
└── pyvenv.cfg ← ConfigurationThe .venv folder can grow quite large (100MB or more) once you start adding packages. Don’t worry—when we learn Git in the next section, we’ll set things up so this folder is ignored and never uploaded. Each person recreates their own .venv from the project recipe instead.
If you’re curious about what your project folder looks like now, you can run this to see its structure:
find . -maxdepth 2 -printAdding packages
Install your first package
Now for the exciting part—let’s start installing the tools you’ll need for GIS work. We’ll begin with pandas, the foundational data analysis library:
uv add pandasWatch your terminal as uv works. It’s doing three things at once:
- Downloading pandas and all the other packages pandas depends on (like numpy)
- Updating your
pyproject.tomlto record that your project now needs pandas - Creating a lock file (
uv.lock) that records the exact versions of everything it installed
If you open pyproject.toml again, you’ll see the change:
[project]
name = "class343"
version = "0.1.0"
description = "Add your description here"
readme = "README.md"
requires-python = ">=3.12"
dependencies = [
    "pandas>=2.2.3",  # ← Added automatically!
]
You didn’t have to edit this file yourself—uv took care of it.
Install multiple packages at once
You can install several packages in one go. Let’s add the rest of the GIS stack you’ll need:
uv add geopandas matplotlibNotice how fast that was? This is where uv really shines compared to pip.
Every time you run uv add, the same four things happen behind the scenes: the package is downloaded, dependencies are resolved (so nothing conflicts), pyproject.toml is updated, and uv.lock is updated.
Understanding uv.lock — your reproducibility guarantee
Open the uv.lock file in your editor. It’s long and detailed—that’s a good thing! Here’s a small excerpt of what it looks like:
[[package]]
name = "pandas"
version = "2.2.3"
source = { registry = "https://pypi.org/simple" }
dependencies = [
    { name = "numpy" },
    { name = "python-dateutil" },
    { name = "pytz" },
]
...
This file records the exact version of every single package in your environment, including all the packages that your packages depend on (called “transitive dependencies”). Why does this matter? Because when your classmate or supervisor runs uv sync on their machine, they’ll get precisely the same versions you have. No surprises, no “works on my machine” problems.
Keep uv.lock safe—it’s your reproducibility guarantee. When we learn Git in the next section, this will be one of the files you’ll want to save and share. Without it, someone else trying to run your project might end up with different package versions and things could break.
Running code in your environment
Quick test
Let’s make sure everything is working. Run this one-liner in your terminal to check that GeoPandas imports correctly:
uv run python -c "import geopandas as gpd; print('✅ GeoPandas', gpd.__version__)"If everything is set up properly, you should see:
✅ GeoPandas 1.1.xNotice that we used uv run python instead of just python. This is important—uv run makes sure the command uses your project’s virtual environment (the packages in your .venv folder) rather than whatever Python happens to be installed globally on your machine.
Comprehensive test
Let’s do a more thorough check. Create a new file called verify_setup.py in your class343 folder and paste in the following code:
"""
Verification script for GIS environment setup
University of Auckland - GISCI 343
"""

import sys
import pandas as pd
import geopandas as gpd
import matplotlib.pyplot as plt
from shapely.geometry import Point

print("=" * 50)
print("GIS Environment Verification")
print("=" * 50)

# Check Python version
print(f"\n✅ Python version: {sys.version.split()[0]}")

# Check package versions
print(f"✅ pandas version: {pd.__version__}")
print(f"✅ geopandas version: {gpd.__version__}")
print(f"✅ matplotlib version: {plt.matplotlib.__version__}")

# Test GeoPandas functionality
print("\n" + "=" * 50)
print("Testing GeoPandas...")
print("=" * 50)

# Create a sample GeoDataFrame with Auckland and Wellington
cities = gpd.GeoDataFrame({
    'city': ['Auckland', 'Wellington', 'Christchurch'],
    'population': [1657200, 215100, 381500],
    'geometry': [
        Point(174.7633, -36.8485),  # Auckland
        Point(174.7762, -41.2865),  # Wellington
        Point(172.6362, -43.5321)   # Christchurch
    ]
}, crs='EPSG:4326')

print(cities)

print("\n✅ All tests passed! Your GIS environment is ready.")
print("\n" + "=" * 50)
Now run it:
uv run python verify_setup.py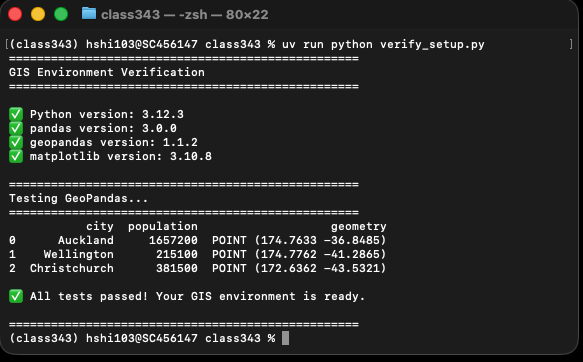
If everything is working, you should see a nice table with three New Zealand cities and a row of green checkmarks. If you do—congratulations, your GIS environment is fully set up!
Why uv run and not just python? When you type uv run python verify_setup.py, uv automatically activates your project’s virtual environment, runs the script inside it, and then cleans up. You don’t have to manually “activate” anything. It’s simpler, and it means you’ll never accidentally run code with the wrong set of packages.
Managing dependencies
As you work through the semester, you’ll occasionally need to check what’s installed, add new packages, or remove ones you no longer need. Here’s how.
Seeing what’s installed
To get a list of everything in your environment:
uv pip listYou’ll see a neat table like this:
Package      Version
------------ -------
pandas       2.2.3
numpy        1.26.4
geopandas    1.1.2
...
This is handy when you want to double-check which version of a package you’re running, or when you’re troubleshooting an issue.
Removing a package
If you installed something you no longer need, you can remove it cleanly:
uv remove foliumThis doesn’t just delete the package—it also updates pyproject.toml and uv.lock so your project recipe stays accurate.
Upgrading packages
Occasionally you might want to update your packages to get bug fixes or new features:
uv lock --upgrade
uv syncA word of caution about upgrading: Newer isn’t always better. Sometimes a package update can change how a function behaves, which might break your existing code. It’s best to upgrade early in a project (before you’ve written much code) rather than right before a deadline. And always test your code after upgrading to make sure everything still works.
Quick reference
Here’s everything from this section in one place. Come back to this whenever you need a reminder.
# Start a new project
uv init
uv venv

# Add packages
uv add pandas geopandas matplotlib

# Run your code
uv run python script.py

# Recreate the environment on a new machine
uv venv
uv sync

# See what's installed
uv pip list

# Update all packages
uv lock --upgrade
uv sync

# Remove a package
uv remove package-name